```
### 4. 复制项目示例代码 [#4-复制项目示例代码]
声网实时互动 Web SDK 提供两种模式的音视频互动,分别是视频通话和互动直播。两者创建客户端时设置的 `mode` 参数不同:
```javascript
// 视频通话场景下 mode 设为 rtc
rtc.client = AgoraRTC.createClient({ mode: "rtc", codec: "vp8" });
// 视频直播场景下 mode 设为 live
rtc.client = AgoraRTC.createClient({ mode: "live", codec: "vp8" });
```
你可以直接将以下代码复制到 `basicEngagement.js` 文件中来快速体验互动直播,注意将 `appID`、`token` 和频道名替换为[你自己的 App ID 和临时 Token](#rtc-web-prerequisites)以及频道名。
互动直播视频通话
```javascript
import AgoraRTC from "agora-rtc-sdk-ng";
let rtc = {
// For the local audio and video tracks.
localAudioTrack: null,
localVideoTrack: null,
client: null,
};
let options = {
// Pass your app ID here.
appId: "your_app_id",
// Set the channel name.
channel: "test",
// Use a temp token
token: "your_temp_token",
// Uid
uid: 123456,
};
async function startBasicLiveStreaming() {
rtc.client = AgoraRTC.createClient({mode: "live", codec: "vp8"});
window.onload = function () {
document.getElementById("host-join").onclick = async function () {
rtc.client.setClientRole("host");
await rtc.client.join(options.appId, options.channel, options.token, options.uid);
// Create an audio track from the audio sampled by a microphone.
rtc.localAudioTrack = await AgoraRTC.createMicrophoneAudioTrack();
// Create a video track from the video captured by a camera.
rtc.localVideoTrack = await AgoraRTC.createCameraVideoTrack();
// Publish the local audio and video tracks to the channel.
await rtc.client.publish([rtc.localAudioTrack, rtc.localVideoTrack]);
// Dynamically create a container in the form of a DIV element for playing the local video track.
const localPlayerContainer = document.createElement("div");
// Specify the ID of the DIV container. You can use the `uid` of the remote user.
localPlayerContainer.id = options.uid;
localPlayerContainer.textContent = "Local user " + options.uid;
localPlayerContainer.style.width = "640px";
localPlayerContainer.style.height = "480px";
document.body.append(localPlayerContainer);
rtc.localVideoTrack.play(localPlayerContainer);
console.log("publish success!");
};
document.getElementById("audience-join").onclick = async function () {
rtc.client.setClientRole("audience");
await rtc.client.join(options.appId, options.channel, options.token, options.uid);
rtc.client.on("user-published", async (user, mediaType) => {
// Subscribe to a remote user.
await rtc.client.subscribe(user, mediaType);
console.log("subscribe success");
// If the subscribed track is video.
if (mediaType === "video") {
// Get `RemoteVideoTrack` in the `user` object.
const remoteVideoTrack = user.videoTrack;
// Dynamically create a container in the form of a DIV element for playing the remote video track.
const remotePlayerContainer = document.createElement("div");
// Specify the ID of the DIV container. You can use the `uid` of the remote user.
remotePlayerContainer.id = user.uid.toString();
remotePlayerContainer.textContent = "Remote user " + user.uid.toString();
remotePlayerContainer.style.width = "640px";
remotePlayerContainer.style.height = "480px";
document.body.append(remotePlayerContainer);
// Play the remote video track.
// Pass the DIV container and the SDK dynamically creates a player in the container for playing the remote video track.
remoteVideoTrack.play(remotePlayerContainer);
}
// If the subscribed track is audio.
if (mediaType === "audio") {
// Get `RemoteAudioTrack` in the `user` object.
const remoteAudioTrack = user.audioTrack;
// Play the audio track. No need to pass any DOM element.
remoteAudioTrack.play();
}
});
rtc.client.on("user-unpublished", user => {
// Get the dynamically created DIV container.
const remotePlayerContainer = document.getElementById(user.uid);
// Destroy the container.
remotePlayerContainer.remove();
});
};
document.getElementById("leave").onclick = async function () {
// Close all the local tracks.
rtc.localAudioTrack.close();
rtc.localVideoTrack.close();
// Traverse all remote users.
rtc.client.remoteUsers.forEach(user => {
// Destroy the dynamically created DIV containers.
const playerContainer = document.getElementById(user.uid);
playerContainer && playerContainer.remove();
});
// Leave the channel.
await rtc.client.leave();
};
};
}
startBasicLiveStreaming();
```
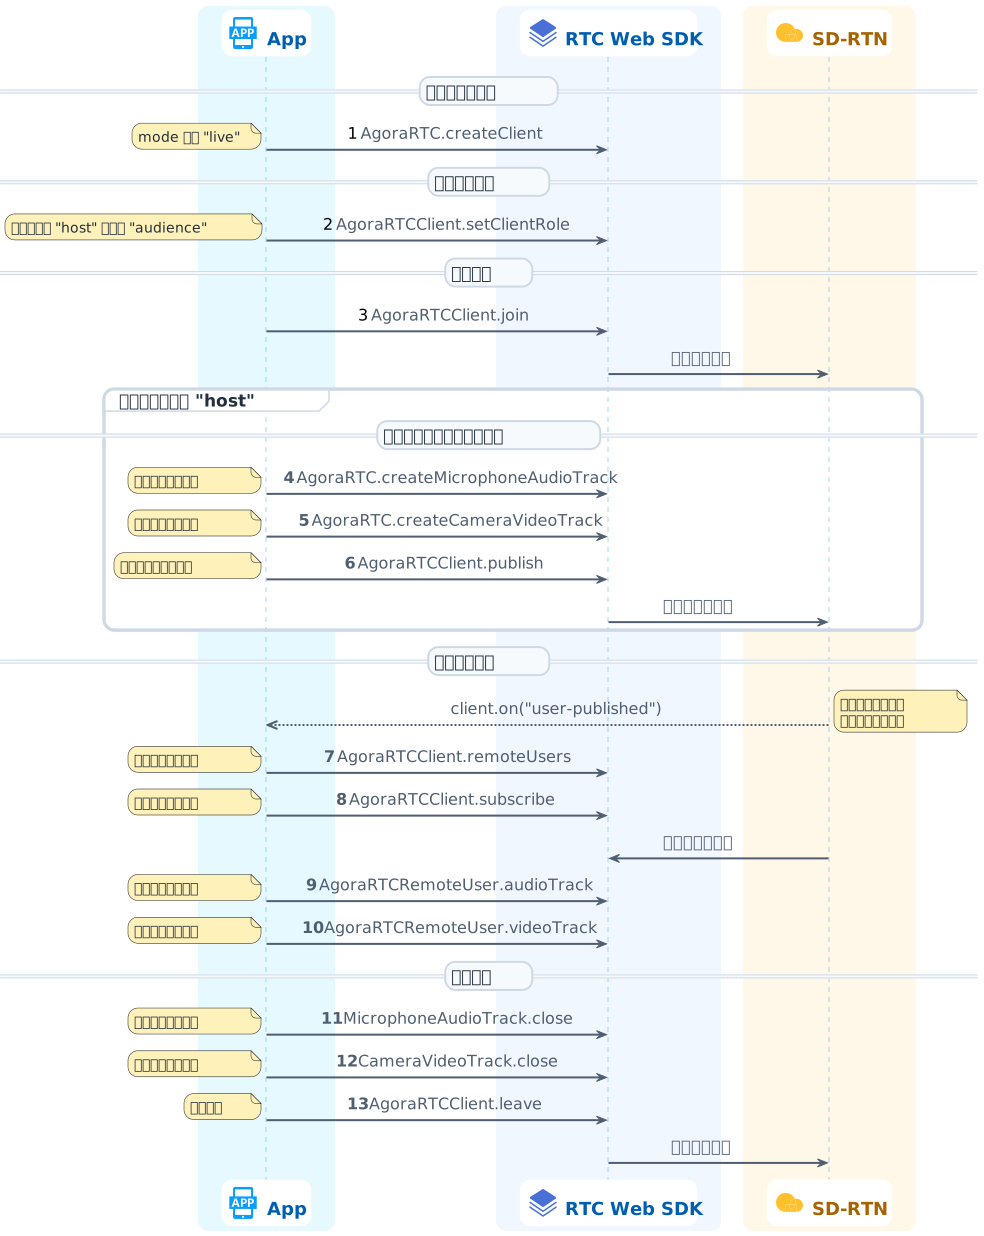
下图展示了基础的音视频直播的 API 调用。注意图中的方法是对不同的对象调用的。
```javascript
import AgoraRTC from "agora-rtc-sdk-ng";
let rtc = {
localAudioTrack: null,
localVideoTrack: null,
client: null,
};
let options = {
// Pass your App ID here.
appId: "Your App ID",
// Set the channel name.
channel: "test",
// Pass your temp token here.
token: "Your temp token",
// Set the user ID.
uid: 123456,
};
async function startBasicCall() {
// Create an AgoraRTCClient object.
rtc.client = AgoraRTC.createClient({mode: "rtc", codec: "vp8"});
// Listen for the "user-published" event, from which you can get an AgoraRTCRemoteUser object.
rtc.client.on("user-published", async (user, mediaType) => {
// Subscribe to the remote user when the SDK triggers the "user-published" event
await rtc.client.subscribe(user, mediaType);
console.log("subscribe success");
// If the remote user publishes a video track.
if (mediaType === "video") {
// Get the RemoteVideoTrack object in the AgoraRTCRemoteUser object.
const remoteVideoTrack = user.videoTrack;
// Dynamically create a container in the form of a DIV element for playing the remote video track.
const remotePlayerContainer = document.createElement("div");
// Specify the ID of the DIV container. You can use the uid of the remote user.
remotePlayerContainer.id = user.uid.toString();
remotePlayerContainer.textContent = "Remote user " + user.uid.toString();
remotePlayerContainer.style.width = "640px";
remotePlayerContainer.style.height = "480px";
document.body.append(remotePlayerContainer);
// Play the remote video track.
// Pass the DIV container and the SDK dynamically creates a player in the container for playing the remote video track.
remoteVideoTrack.play(remotePlayerContainer);
}
// If the remote user publishes an audio track.
if (mediaType === "audio") {
// Get the RemoteAudioTrack object in the AgoraRTCRemoteUser object.
const remoteAudioTrack = user.audioTrack;
// Play the remote audio track. No need to pass any DOM element.
remoteAudioTrack.play();
}
// Listen for the "user-unpublished" event
rtc.client.on("user-unpublished", user => {
// Get the dynamically created DIV container.
const remotePlayerContainer = document.getElementById(user.uid);
// Destroy the container.
remotePlayerContainer.remove();
});
});
window.onload = function () {
document.getElementById("join").onclick = async function () {
// Join an RTC channel.
await rtc.client.join(options.appId, options.channel, options.token, options.uid);
// Create a local audio track from the audio sampled by a microphone.
rtc.localAudioTrack = await AgoraRTC.createMicrophoneAudioTrack();
// Create a local video track from the video captured by a camera.
rtc.localVideoTrack = await AgoraRTC.createCameraVideoTrack();
// Publish the local audio and video tracks to the RTC channel.
await rtc.client.publish([rtc.localAudioTrack, rtc.localVideoTrack]);
// Dynamically create a container in the form of a DIV element for playing the local video track.
const localPlayerContainer = document.createElement("div");
// Specify the ID of the DIV container. You can use the uid of the local user.
localPlayerContainer.id = options.uid;
localPlayerContainer.textContent = "Local user " + options.uid;
localPlayerContainer.style.width = "640px";
localPlayerContainer.style.height = "480px";
document.body.append(localPlayerContainer);
// Play the local video track.
// Pass the DIV container and the SDK dynamically creates a player in the container for playing the local video track.
rtc.localVideoTrack.play(localPlayerContainer);
console.log("publish success!");
};
document.getElementById("leave").onclick = async function () {
// Destroy the local audio and video tracks.
rtc.localAudioTrack.close();
rtc.localVideoTrack.close();
// Traverse all remote users.
rtc.client.remoteUsers.forEach(user => {
// Destroy the dynamically created DIV containers.
const playerContainer = document.getElementById(user.uid);
playerContainer && playerContainer.remove();
});
// Leave the channel.
await rtc.client.leave();
};
};
}
startBasicCall();
```
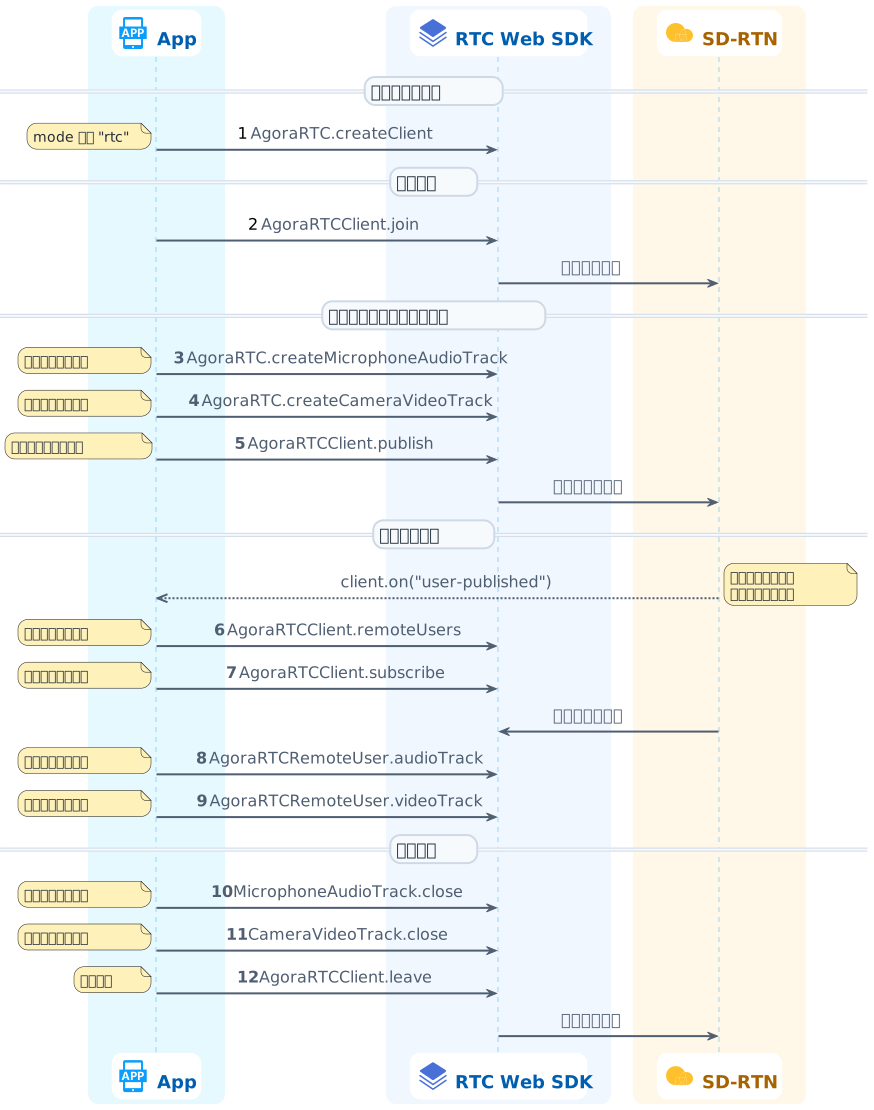
下图展示了实现音视频互动的 API 调用流程。注意图中的方法是对不同的对象调用的。
### 5. 测试 App [#5-测试-app]
本文使用 [webpack](https://webpack.js.org/) 打包项目,使用 `webpack-dev-server` 运行项目。
参考以下步骤来测试你的 App:
在 `package.json` 的 `dependencies` 字段中添加 `webpack`、`webpack-cli` 和 `webpack-dev-server`,并在 `scripts` 字段中添加 `build` 和 `start:dev`。
```json
{
"name": "agora_web_quickstart",
"version": "1.0.0",
"description": "",
"main": "basicEngagement.js",
"scripts": {
"test": "echo \"Error: no test specified\" && exit 1",
// [!code highlight:2]
"build": "webpack --config webpack.config.js",
"start:dev": "webpack serve --open --config webpack.config.js"
},
"dependencies": {
"agora-rtc-sdk-ng": "latest",
// [!code highlight:3]
"webpack": "5.28.0",
"webpack-dev-server": "3.11.2",
"webpack-cli": "4.10.0"
},
"author": "",
"license": "ISC"
}
```
在项目目录中创建一个名为 `webpack.config.js` 的文件,将以下代码复制到 `webpack.config.js` 配置 webpack:
```javascript
const path = require("path");
module.exports = {
entry: "./basicEngagement.js",
output: {
filename: "bundle.js",
path: path.resolve(__dirname, "./dist"),
},
devServer: {
compress: true,
port: 9000,
},
};
```
运行下列命令安装依赖:
```shell
npm install
```
运行下列命令通过 webpack 编译项目:
```shell
# Use webpack to package the project
npm run build
```
通过 webpack-dev-server 运行项目:
```shell
npm run start:dev
```
:::info[信息]
- 在本地服务器 (localhost) 运行 Web 应用仅作为测试用途。部署生产环境时,请确保使用 HTTPS 协议。
- 由于浏览器的安全策略,声网对除 127.0.0.1 以外的 HTTP 地址作了限制。
:::
### 6. 查看预期效果 [#6-查看预期效果]
互动直播视频通话
你的浏览器会自动打开以下页面:
点击 **Join as host** 以主播角色加入频道。你还可以邀请朋友克隆 [Gitee 示例项目](https://gitee.com/agoraio-community/API-Examples-Web)或 [GitHub 示例项目](https://github.com/Shengwang-Lab/API-Examples-Web)到本地,在浏览器中打开 `src/index.html` 文件,并输入相同的 App ID、频道名称和临时 Token。你的朋友以主播角色加入频道后,你们可以看到彼此,并听到彼此的声音;你的朋友以观众角色加入频道后,他可以看到你,并听到你的声音。
你的浏览器会自动打开以下页面:
点击 **JOIN** 加入频道。你还可以邀请朋友克隆 [Gitee 示例项目](https://gitee.com/agoraio-community/API-Examples-Web)或 [GitHub 示例项目](https://github.com/Shengwang-Lab/API-Examples-Web)到本地,在浏览器中打开 `src/index.html` 文件,并输入相同的 App ID、频道名称和临时 Token。你的朋友加入频道后,你们可以看到彼此,并听到彼此的声音。
### 7. 后续步骤 [#7-后续步骤]
在完成音视频互动后,你可以阅读以下文档进一步了解:
- 本文的示例使用了临时 Token 加入频道。在正式生产环境中,为保障通信安全,你需要在自己的 App 服务端生成 Token。详见[使用 Token 鉴权](/zh-CN/realtime-media/rtc/build/setup-and-access/token-authentication)。
- 如果你想要实现极速直播场景,可以在互动直播的基础上,通过修改观众端的延时级别为低延时实现。详见[实现极速直播](/zh-CN/realtime-media/rtc/build/advanced-channel/ls-quick-start)。
## 参考信息 [#参考信息-3]
### 示例项目 [#示例项目-3]
声网提供了开源的示例项目供你参考,你可以前往下载或查看其中的源代码。
Web-API-Examples} href="https://gitee.com/agoraio-community/API-Examples-Web/tree/main/src/example" />
Web-API-Examples} href="https://github.com/Shengwang-Lab/API-Examples-Web/tree/main/src/example" />
### 其它集成方式 [#其它集成方式]
使用 npm 集成 Web SDK 还支持开启 Tree shaking 来减小集成 SDK 后的 App 体积,详见[使用 Tree shaking](/zh-CN/realtime-media/rtc/build/optimize-and-operate/tree-shaking)。
除使用 npm 获取 Web SDK 之外,你还可以使用以下方法获取 SDK:
- 在项目 HTML 文件中,添加如下代码,使用 CDN 方法获取 SDK:
```html
```
- 下载[声网 Web SDK 4.x 版本 SDK 包](/zh-CN/realtime-media/rtc/reference/downloads)至本地,将 SDK 包中的 `.js` 文件保存到项目文件所在的目录下,然后在项目 HTML 文件中添加如下代码:
```html
```
:::info[信息]
在以上方法中,SDK 都会在全局导出一个 `AgoraRTC` 对象,直接访问这个对象即可操作 SDK。
:::
### 常见问题 [#常见问题-3]
**为什么在本地运行快速开始项目时会报错 `digital envelope routines::unsupported`?**
本文中的快速开始项目通过 webpack 打包并在本地运行。由于 Node.js 16 及以上版本更改了对 OpenSSL 的依赖(详见 [node issue](https://github.com/nodejs/node/issues/29817)),影响了项目中本地开发环境的依赖(详见 [webpack issue](https://github.com/webpack/webpack/issues/14532)),运行项目会发生错误。解决方案如下:
- (推荐)运行如下命令,设置临时的环境变量:
```shell
export NODE_OPTIONS=--openssl-legacy-provider
```
- 暂时换用低版本的 Node.js。
尝试以上解决方案后,再次尝试运行项目。