# 自定义音频采集和渲染 (/zh-CN/realtime-media/rtc/build/audio/custom-audio-source)
> For AI agents: see the complete documentation index at [llms.txt](/llms.txt).
<_PlatformTabsGroup>
<_PlatformProcessedMarker groupMode="structured" canonicalPlatform="web" platform="android" />
声网默认的音频模块可以满足在 App 中使用基本音频功能的需求。声网 SDK 支持使用自定义的音频源和自定义的音频渲染模块为你的 App 添加特殊的音频功能。
## 技术原理 [#技术原理]
实时音频传输过程中,声网 SDK 通常会开启默认的音频模块。在以下场景中,你可能会发现默认的音频模块无法满足开发需求,需要自定义音频采集或自定义音频渲染。例如:
- App 中已有自己的音频模块。
- 需要使用前处理库处理采集到的音频。
- 某些音频采集设备被系统独占。为避免与其他业务产生冲突,需要灵活的设备管理策略。
使用自定义音频源管理音频帧的采集、处理和播放时,需要使用声网 SDK 外部方法。
#### 音频数据传输 [#音频数据传输]
下图展示在自定义音频采集、音频渲染时,音频数据的传输过程。
**自定义音频采集**
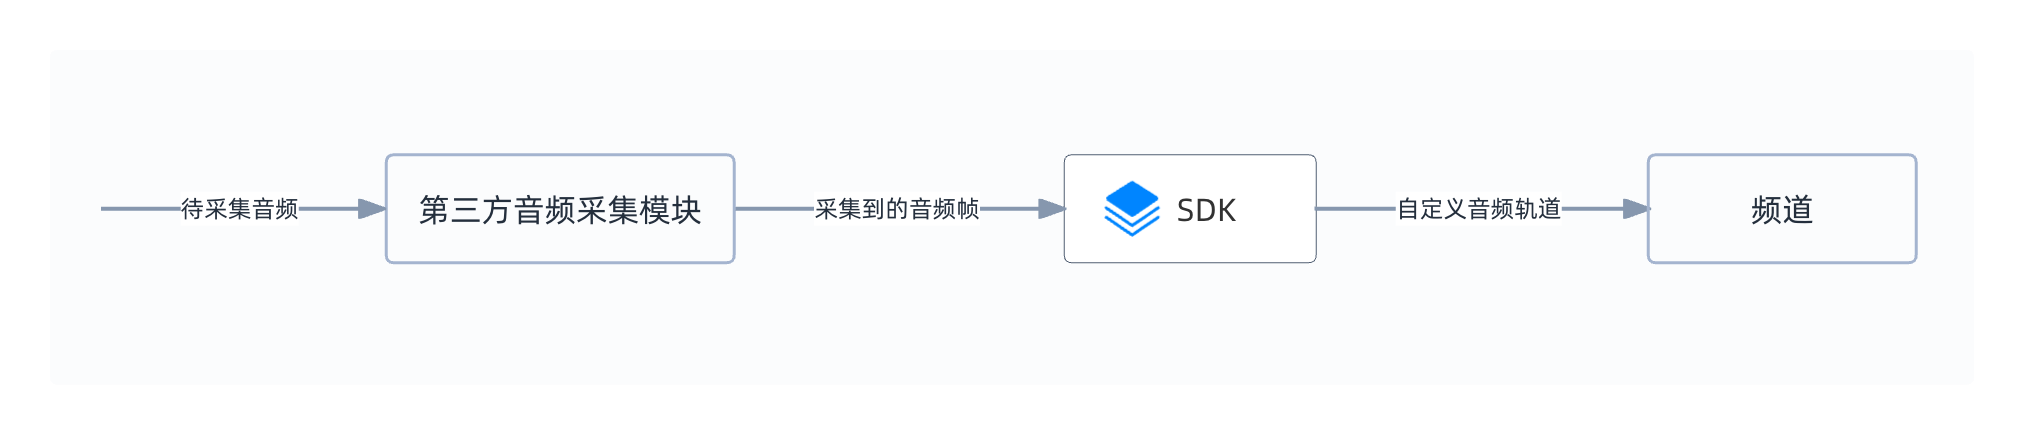
- 你需要使用 SDK 外部方法自行实现采集模块。
- 调用 `pushExternalAudioFrame`,将采集到的音频帧发送给 SDK。
**自定义音频渲染**
- 你需要使用 SDK 外部方法自行实现渲染模块。
- 调用 `pullPlaybackAudioFrame` 获取远端用户发送的音频数据。
## 前提条件 [#前提条件]
在进行操作之前,请确保你已经在项目中实现了基本的实时音视频功能。详见[实现音视频互动](/zh-CN/realtime-media/rtc/get-started/quick-start)。
## 实现方法 [#实现方法]
### 自定义音频采集 [#自定义音频采集]
本节介绍如何实现自定义音频采集。
参考以下调用时序图,在你的 App 中实现自定义音频采集:
#### API 调用步骤 [#api-调用步骤]
参考如下步骤,在你的项目中实现自定义音频采集功能:
1. 创建自定义音频轨道
初始化 `RtcEngine` 后,调用 `createCustomAudioTrack` 创建自定义音频轨道并获得音频轨道 ID。
```java
AudioTrackConfig config = new AudioTrackConfig();
config.enableLocalPlayback = false;
customAudioTrack = engine.createCustomAudioTrack(Constants.AudioTrackType.AUDIO_TRACK_MIXABLE, config);
```
2. 加入频道并发布自定义音频轨道
调用 `joinChannel`[2/2] 加入频道, 在 `ChannelMediaOptions` 中,将 `publishCustomAudioTrackId` 参数设置为步骤 1 中获得的音频轨道 ID,并将 `publishCustomAudioTrack` 设置为 `true`,即可在频道中发布指定的自定义音频轨道。
:::note[注意]
如需调用 `enableCustomAudioLocalPlayback` 在本地播放外部音频源,或调用 `adjustCustomAudioPlayoutVolume` 调节自定义音频采集轨道在本地播放的音量,请将 `ChannelMediaOptions` 中的 `enableAudioRecordingOrPlayout` 设置为 `true`。
:::
```java
ChannelMediaOptions option = new ChannelMediaOptions();
option.clientRoleType = Constants.CLIENT_ROLE_BROADCASTER;
option.autoSubscribeAudio = true;
option.autoSubscribeVideo = true;
// 音频自采集场景下,不发布麦克风采集的音频
option.publishMicrophoneTrack = false;
// 发布自采集音频流
option.publishCustomAudioTrack = true;
// 设置自定义音频轨道 ID
option.publishCustomAudioTrackId = customAudioTrack;
// 加入频道
int res = engine.joinChannel(accessToken, channelId, 0, option);
```
3. 实现自采集模块
声网提供了 [AudioFileReader.java](https://github.com/Shengwang-Community/API-Examples/blob/main/Android/APIExample/app/src/main/java/io/agora/api/example/utils/AudioFileReader.java) 示例项目,演示从本地文件读取 PCM 格式的音频数据。在实际项目中,你需要结合业务创建自定义音频采集模块。
4. 通过自定义音频轨道推送音频数据到 SDK
调用 `pushExternalAudioFrame` 将采集到的音频帧通过自定义音频轨道推送至 SDK。其中,`trackId` 要与步骤 2 加入频道时指定的音频轨道 ID 一致,`sampleRate`、`channels` 和 `bytesPerSample` 用于设置外部音频帧的采样率、声道数和每个采样点的字节数。
:::info[信息]
为确保音视频同步,声网建议你调用 `getCurrentMonotonicTimeInMs` 获取当前的 Monotonic Time,将 `timestamp`(时间戳)设置为系统 Monotonic Time。
:::
```java
audioPushingHelper = new AudioFileReader(requireContext(), (buffer, timestamp) -> {
if (joined && engine != null && customAudioTrack != -1) {
// 推送外部音频帧至 SDK
int ret = engine.pushExternalAudioFrame(buffer, timestamp,
AudioFileReader.SAMPLE_RATE,
AudioFileReader.SAMPLE_NUM_OF_CHANNEL,
Constants.BytesPerSample.TWO_BYTES_PER_SAMPLE,
customAudioTrack);
Log.i(TAG, "pushExternalAudioFrame times:" + (++pushTimes) + ", ret=" + ret);
}
});
```
5. 销毁自定义音频轨道
如果你需要停止发布自定义采集的音频,调用 `destroyCustomAudioTrack` 销毁自定义音频轨道。
```java
engine.destroyCustomAudioTrack(customAudioTrack);
```
### 自定义音频渲染 [#自定义音频渲染]
本节介绍如何实现自定义音频渲染。你可以采用如下两种方式实现自定义音频渲染。
参考以下调用时序图,在你的 App 中实现自定义音频渲染:
1. 调用 `joinChannel` 加入频道前,调用 `setExternalAudioSink` 开启和配置自定义音频渲染。
```java
rtcEngine.setExternalAudioSink(
true, // 开启自定义音频渲染
44100, // 采样率 (Hz)。你可以将该值设置为 16000、32000、44100 或者 48000
1 // 自定义音频源的声道数。你可以将该值设置为 1 或 2
);
```
2. 加入频道后,调用 `pullPlaybackAudioFrame` 获取远端用户发送的音频数据。使用你自己的音频渲染器处理音频数据,然后播放已渲染的数据。
```java
private class FileThread implements Runnable {
@Override
public void run() {
while (mPull) {
int lengthInByte = 48000 / 1000 * 2 * 1 * 10;
ByteBuffer frame = ByteBuffer.allocateDirect(lengthInByte);
int ret = engine.pullPlaybackAudioFrame(frame, lengthInByte);
byte[] data = new byte[frame.remaining()];
frame.get(data, 0, data.length);
// 写入本地文件或由播放器进行渲染
FileIOUtils.writeFileFromBytesByChannel("/sdcard/agora/pull_48k.pcm", data, true, true);
try {
Thread.sleep(10);
} catch (InterruptedException e) {
e.printStackTrace();
}
}
}
}
```
#### 使用原始音频数据回调 [#使用原始音频数据回调]
开始前,请确保你的项目中已实现原始音频数据的采集和处理。详见[原始音频数据](/zh-CN/realtime-media/rtc/build/audio/raw-audio-data)。
参考如下步骤,在你的项目中调用原始音频数据 API 实现自定义音频渲染:
1. 从 `onRecordAudioFrame`,`onPlaybackAudioFrame`,`onMixedAudioFrame` 或 `onPlaybackAudioFrameBeforeMixing` 获取待播放的音频数据。
2. 自行渲染并播放音频数据。
## 参考信息 [#参考信息]
### 示例项目 [#示例项目]
声网提供了开源的音频自采集和音频自渲染的示例项目供你参考,你可以前往下载或查看其中的源代码。
CustomAudioSource} href="https://gitee.com/agoraio-community/API-Examples/blob/main/Android/APIExample/app/src/main/java/io/agora/api/example/examples/advanced/customaudio/CustomAudioSource.java" />
CustomAudioSource} href="https://github.com/Shengwang-Community/API-Examples/blob/main/Android/APIExample/app/src/main/java/io/agora/api/example/examples/advanced/customaudio/CustomAudioSource.java" />
CustomAudioRender} href="https://gitee.com/agoraio-community/API-Examples/blob/main/Android/APIExample/app/src/main/java/io/agora/api/example/examples/advanced/customaudio/CustomAudioRender.java" />
CustomAudioRender} href="https://github.com/Shengwang-Community/API-Examples/blob/main/Android/APIExample/app/src/main/java/io/agora/api/example/examples/advanced/customaudio/CustomAudioRender.java" />
### API 参考 [#api-参考]
- [`createCustomAudioTrack`](/zh-CN/api-reference/rtc/android/audio/audio-custom-capturenrendering#createcustomaudiotrack)
- [`destroyCustomAudioTrack`](/zh-CN/api-reference/rtc/android/audio/audio-custom-capturenrendering#destroycustomaudiotrack)
- [`pushExternalAudioFrame`](/zh-CN/api-reference/rtc/android/audio/audio-custom-capturenrendering#api_irtcengine_pushaudioframe2)
- [`setExternalAudioSink`](/zh-CN/api-reference/rtc/android/audio/audio-custom-capturenrendering#setexternalaudiosink)
- [`pullPlaybackAudioFrame`[1/2]](/zh-CN/api-reference/rtc/android/audio/audio-custom-capturenrendering#api_irtcengine_pullaudioframe)
- [`pullPlaybackAudioFrame`[2/2]](/zh-CN/api-reference/rtc/android/audio/audio-custom-capturenrendering#api_irtcengine_pullaudioframe2)
<_PlatformProcessedMarker close="true" />
<_PlatformProcessedMarker groupMode="structured" canonicalPlatform="web" platform="ios" />
声网默认的音频模块可以满足在 App 中使用基本音频功能的需求。声网 SDK 支持使用自定义的音频源和自定义的音频渲染模块为你的 App 添加特殊的音频功能。
## 技术原理 [#技术原理-1]
实时音频传输过程中,声网 SDK 通常会开启默认的音频模块。在以下场景中,你可能会发现默认的音频模块无法满足开发需求,需要自定义音频采集或自定义音频渲染。例如:
- App 中已有自己的音频模块。
- 需要使用前处理库处理采集到的音频。
- 某些音频采集设备被系统独占。为避免与其他业务产生冲突,需要灵活的设备管理策略。
使用自定义音频源管理音频帧的采集、处理和播放时,需要使用声网 SDK 外部方法。
#### 音频数据传输 [#音频数据传输-1]
下图展示在自定义音频采集、音频渲染时,音频数据的传输过程。
**自定义音频采集**

- 你需要使用 SDK 外部方法自行实现采集模块。
- 调用 `pushExternalAudioFrameSampleBuffer` 或 `pushExternalAudioFrameRawData`,将采集到的音频帧发送给 SDK。
**自定义音频渲染**
- 你需要使用 SDK 外部方法自行实现渲染模块。
- 调用 `pullPlaybackAudioFrame` 获取远端用户发送的音频数据。
## 前提条件 [#前提条件-1]
在进行操作之前,请确保你已经在项目中实现了基本的实时音视频功能。详见[实现音视频互动](/zh-CN/realtime-media/rtc/get-started/quick-start)。
## 实现方法 [#实现方法-1]
### 自定义音频采集 [#自定义音频采集-1]
本节介绍如何实现自定义音频采集。
参考以下调用时序图,在你的 App 中实现自定义音频采集:
#### API 调用步骤 [#api-调用步骤-1]
参考如下步骤,在你的项目中实现自定义音频采集功能:
1. 创建自定义音频轨道
初始化 `AgoraRtcEngineKit` 后,调用 `createCustomAudioTrack` 创建自定义音频轨道并获得音频轨道 ID。
```swift
let audioTrack = AgoraAudioTrackConfig()
audioTrack.enableLocalPlayback = true
trackId = agoraKit.createCustomAudioTrack(.mixable, config: audioTrack)
```
2. 加入频道并发布自定义音频轨道
调用 `joinChannelByToken`[2/4] 加入频道,在 `AgoraRtcChannelMediaOptions` 中,将 `publishCustomAudioTrackId` 参数设置为步骤 1 中获得的音频轨道 ID,并将 `publishCustomAudioTrack` 设置为 `YES`,即可在频道中发布指定的自定义音频轨道。
:::warning[注意]
如需调用 `enableCustomAudioLocalPlayback` 在本地播放外部音频源,或调用 `adjustCustomAudioPlayoutVolume` 调节自定义音频采集轨道在本地播放的音量,请将 `AgoraRtcChannelMediaOptions` 中的 `enableAudioRecordingOrPlayout` 设置为 `YES`。
:::
```swift
let option = AgoraRtcChannelMediaOptions()
// 音频自采集场景下,不发布麦克风采集的音频
option.publishMicrophoneTrack = false;
// 发布自采集音频流
option.publishCustomAudioTrack = true
// 设置自定义音频轨道 ID
option.publishCustomAudioTrackId = Int(trackId)
option.clientRoleType = GlobalSettings.shared.getUserRole()
NetworkManager.shared.generateToken(channelName: channelName, success: { token in
// 加入频道
let result = self.agoraKit.joinChannel(byToken: token, channelId: channelName, uid: 0, mediaOptions: option)
if result != 0 {
self.showAlert(title: "Error", message: "joinChannel call failed: \(result), please check your params")
}
})
```
3. 实现自采集模块
声网提供了 [CustomPcmAudioSource.swift](https://github.com/Shengwang-Community/API-Examples/tree/main/iOS/APIExample/APIExample/Examples/Advanced/CustomPcmAudioSource) 示例项目,演示从本地文件读取 PCM 格式的音频数据。在实际项目中,你需要结合业务创建自定义音频采集模块。
4. 通过自定义音频轨道推送音频数据到 SDK
调用 `pushExternalAudioFrameRawData` 将采集到的音频帧通过自定义音频轨道推送至 SDK。其中,`trackId` 要与步骤 2 加入频道时指定的音频轨道 ID 一致,`sampleRate`、`channels` 和 `samples` 用于设置外部音频帧的采样率、声道数和采样数。
:::info[信息]
- 为确保音视频同步,声网建议你调用 `getCurrentMonotonicTimeInMs` 获取当前的 Monotonic Time,将 `timestamp`(时间戳)设置为系统 Monotonic Time。
- 如果需要推送 CMSampleBuffer 格式的音频帧,请改用 `pushExternalAudioFrameSampleBuffer`。
:::
```swift
extension CustomAudioSource: AgoraPcmSourcePushDelegate {
func onAudioFrame(data: UnsafeMutablePointer) {
agoraKit.pushExternalAudioFrameRawData(data,
samples: samples,
sampleRate: Int(sampleRate),
channels: Int(audioChannel),
trackId: Int(trackId),
timestamp: 0)
}
}
```
5. 销毁自定义音频轨道
如果你需要停止发布自定义采集的音频,调用 `destroyCustomAudioTrack` 销毁自定义音频轨道。
```swift
agoraKit.destroyCustomAudioTrack(Int(trackId))
```
### 自定义音频渲染 [#自定义音频渲染-1]
本节介绍如何实现自定义音频渲染。
开始前,请确保你的项目中已实现原始音频数据的采集和处理。详见[原始音频数据](/zh-CN/realtime-media/rtc/build/audio/raw-audio-data)。
参考如下步骤,在你的项目中调用原始音频数据 API 实现自定义音频渲染:
1. 从 `onRecordAudioFrame`,`onPlaybackAudioFrame`,`onMixedAudioFrame` 或 `onPlaybackAudioFrameBeforeMixing` 获取待播放的音频数据。
2. 自行渲染并播放音频数据。
## 参考信息 [#参考信息-1]
### 示例项目 [#示例项目-1]
声网提供了开源的音频自采集和音频自渲染的示例项目供你参考,你可以前往下载或查看其中的源代码。
CustomPcmAudioSource} href="https://gitee.com/agoraio-community/API-Examples/tree/main/iOS/APIExample/APIExample/Examples/Advanced/CustomPcmAudioSource" />
CustomPcmAudioSource} href="https://github.com/Shengwang-Community/API-Examples/tree/main/iOS/APIExample/APIExample/Examples/Advanced/CustomPcmAudioSource" />
CustomAudioRender} href="https://gitee.com/agoraio-community/API-Examples/tree/main/iOS/APIExample/APIExample/Examples/Advanced/CustomAudioRender" />
CustomAudioRender} href="https://github.com/Shengwang-Community/API-Examples/tree/main/iOS/APIExample/APIExample/Examples/Advanced/CustomAudioRender" />
### API 参考 [#api-参考-1]
- [`createCustomAudioTrack`](/zh-CN/api-reference/rtc/ios/audio/audio-custom-capturenrendering#api_irtcengine_createcustomaudiotrack)
- [`destroyCustomAudioTrack`](/zh-CN/api-reference/rtc/ios/audio/audio-custom-capturenrendering#destroycustomaudiotrack)
- [`pushExternalAudioFrameRawData`](/zh-CN/api-reference/rtc/ios/audio/audio-custom-capturenrendering#api_irtcengine_pushaudioframe2)
- [`pushExternalAudioFrameSampleBuffer` [2/2]](/zh-CN/api-reference/rtc/ios/audio/audio-custom-capturenrendering#api_irtcengine_pushexternalaudioframesamplebuffer2)
- [`enableExternalAudioSink`](/zh-CN/api-reference/rtc/ios/audio/audio-custom-capturenrendering#api_irtcengine_setexternalaudiosink)
- [`pullPlaybackAudioFrameRawData`](/zh-CN/api-reference/rtc/ios/audio/audio-custom-capturenrendering#api_irtcengine_pullaudioframe)
<_PlatformProcessedMarker close="true" />
<_PlatformProcessedMarker groupMode="structured" canonicalPlatform="web" platform="macos" />
声网默认的音频模块可以满足在 App 中使用基本音频功能的需求。声网 SDK 支持使用自定义的音频源和自定义的音频渲染模块为你的 App 添加特殊的音频功能。
## 技术原理 [#技术原理-2]
实时音频传输过程中,声网 SDK 通常会开启默认的音频模块。在以下场景中,你可能会发现默认的音频模块无法满足开发需求,需要自定义音频采集或自定义音频渲染。例如:
- App 中已有自己的音频模块。
- 需要使用前处理库处理采集到的音频。
- 某些音频采集设备被系统独占。为避免与其他业务产生冲突,需要灵活的设备管理策略。
使用自定义音频源管理音频帧的采集、处理和播放时,需要使用声网 SDK 外部方法。
#### 音频数据传输 [#音频数据传输-2]
下图展示在自定义音频采集、音频渲染时,音频数据的传输过程。
**自定义音频采集**

- 你需要使用 SDK 外部方法自行实现采集模块。
- 调用 `pushExternalAudioFrameSampleBuffer` 或 `pushExternalAudioFrameRawData`,将采集到的音频帧发送给 SDK。
**自定义音频渲染**
- 你需要使用 SDK 外部方法自行实现渲染模块。
- 调用 `pullPlaybackAudioFrame` 获取远端用户发送的音频数据。
## 前提条件 [#前提条件-2]
在进行操作之前,请确保你已经在项目中实现了基本的实时音视频功能。详见[实现音视频互动](/zh-CN/realtime-media/rtc/get-started/quick-start)。
## 实现方法 [#实现方法-2]
### 自定义音频采集 [#自定义音频采集-2]
本节介绍如何实现自定义音频采集。
参考以下调用时序图,在你的 App 中实现自定义音频采集:
#### API 调用步骤 [#api-调用步骤-2]
参考如下步骤,在你的项目中实现自定义音频采集功能:
1. 创建自定义音频轨道
初始化 `AgoraRtcEngineKit` 后,调用 `createCustomAudioTrack` 创建自定义音频轨道并获得音频轨道 ID。
```swift
let audioTrack = AgoraAudioTrackConfig()
audioTrack.enableLocalPlayback = true
trackId = agoraKit.createCustomAudioTrack(.mixable, config: audioTrack)
```
2. 加入频道并发布自定义音频轨道
调用 `joinChannelByToken`[2/4] 加入频道,在 `AgoraRtcChannelMediaOptions` 中,将 `publishCustomAudioTrackId` 参数设置为步骤 1 中获得的音频轨道 ID,并将 `publishCustomAudioTrack` 设置为 `YES`,即可在频道中发布指定的自定义音频轨道。
:::warning[注意]
如需调用 `enableCustomAudioLocalPlayback` 在本地播放外部音频源,或调用 `adjustCustomAudioPlayoutVolume` 调节自定义音频采集轨道在本地播放的音量,请将 `AgoraRtcChannelMediaOptions` 中的 `enableAudioRecordingOrPlayout` 设置为 `YES`。
:::
```swift
let option = AgoraRtcChannelMediaOptions()
// 音频自采集场景下,不发布麦克风采集的音频
option.publishMicrophoneTrack = false;
// 发布自采集音频流
option.publishCustomAudioTrack = true
// 设置自定义音频轨道 ID
option.publishCustomAudioTrackId = Int(trackId)
option.clientRoleType = GlobalSettings.shared.getUserRole()
NetworkManager.shared.generateToken(channelName: channelName, success: { token in
// 加入频道
let result = self.agoraKit.joinChannel(byToken: token, channelId: channelName, uid: 0, mediaOptions: option)
if result != 0 {
self.showAlert(title: "Error", message: "joinChannel call failed: \(result), please check your params")
}
})
```
3. 实现自采集模块
声网提供了 [CustomAudioSource.swift](https://github.com/Shengwang-Community/API-Examples/tree/main/macOS/APIExample/Examples/Advanced/CustomAudioSource) 示例项目,演示从本地文件读取 PCM 格式的音频数据。在实际项目中,你需要结合业务创建自定义音频采集模块。
4. 通过自定义音频轨道推送音频数据到 SDK
调用 `pushExternalAudioFrameRawData` 将采集到的音频帧通过自定义音频轨道推送至 SDK。其中,`trackId` 要与步骤 2 加入频道时指定的音频轨道 ID 一致,`sampleRate`、`channels` 和 `samples` 用于设置外部音频帧的采样率、声道数和采样数。
:::info[信息]
- 为确保音视频同步,声网建议你调用 `getCurrentMonotonicTimeInMs` 获取当前的 Monotonic Time,将 `timestamp`(时间戳)设置为系统 Monotonic Time。
- 如果需要推送 CMSampleBuffer 格式的音频帧,请改用 `pushExternalAudioFrameSampleBuffer`。
:::
```swift
extension CustomAudioSource: AgoraPcmSourcePushDelegate {
func onAudioFrame(data: UnsafeMutablePointer) {
agoraKit.pushExternalAudioFrameRawData(data,
samples: samples,
sampleRate: Int(sampleRate),
channels: Int(audioChannel),
trackId: Int(trackId),
timestamp: 0)
}
}
```
5. 销毁自定义音频轨道
如果你需要停止发布自定义采集的音频,调用 `destroyCustomAudioTrack` 销毁自定义音频轨道。
```swift
agoraKit.destroyCustomAudioTrack(Int(trackId))
```
### 自定义音频渲染 [#自定义音频渲染-2]
本节介绍如何实现自定义音频渲染。
开始前,请确保你的项目中已实现原始音频数据的采集和处理。详见[原始音频数据](/zh-CN/realtime-media/rtc/build/audio/raw-audio-data)。
参考如下步骤,在你的项目中调用原始音频数据 API 实现自定义音频渲染:
1. 从 `onRecordAudioFrame`,`onPlaybackAudioFrame`,`onMixedAudioFrame` 或 `onPlaybackAudioFrameBeforeMixing` 获取待播放的音频数据。
2. 自行渲染并播放音频数据。
## 参考信息 [#参考信息-2]
### 示例项目 [#示例项目-2]
声网提供了开源的音频自采集和音频自渲染的示例项目供你参考,你可以前往下载或查看其中的源代码。
CustomAudioSource} href="https://gitee.com/agoraio-community/API-Examples/tree/main/macOS/APIExample/Examples/Advanced/CustomAudioSource" />
CustomAudioSource} href="https://github.com/Shengwang-Community/API-Examples/tree/main/macOS/APIExample/Examples/Advanced/CustomAudioSource" />
CustomAudioRender} href="https://gitee.com/agoraio-community/API-Examples/tree/main/macOS/APIExample/Examples/Advanced/CustomAudioRender" />
CustomAudioRender} href="https://github.com/Shengwang-Community/API-Examples/tree/main/macOS/APIExample/Examples/Advanced/CustomAudioRender" />
### API 参考 [#api-参考-2]
- [`createCustomAudioTrack`](/zh-CN/api-reference/rtc/macos/audio/audio-custom-capturenrendering#api_irtcengine_createcustomaudiotrack)
- [`destroyCustomAudioTrack`](/zh-CN/api-reference/rtc/macos/audio/audio-custom-capturenrendering#destroycustomaudiotrack)
- [`pushExternalAudioFrameRawData`](/zh-CN/api-reference/rtc/macos/audio/audio-custom-capturenrendering#api_irtcengine_pushaudioframe2)
- [`pushExternalAudioFrameSampleBuffer` [2/2]](/zh-CN/api-reference/rtc/macos/audio/audio-custom-capturenrendering#api_irtcengine_pushexternalaudioframesamplebuffer2)
- [`enableExternalAudioSink`](/zh-CN/api-reference/rtc/macos/audio/audio-custom-capturenrendering#api_irtcengine_setexternalaudiosink)
- [`pullPlaybackAudioFrameRawData`](/zh-CN/api-reference/rtc/macos/audio/audio-custom-capturenrendering#api_irtcengine_pullaudioframe)
<_PlatformProcessedMarker close="true" />
<_PlatformProcessedMarker groupMode="structured" canonicalPlatform="web" platform="web" />
实时音视频传输过程中,声网 SDK 通常会启动默认的音频模块进行采集。在以下场景中,你可能会发现默认的音频模块无法满足开发需求:
- App 中已有自己的音频模块
- 希望使用非麦克风采集的音频源,比如裸 PCM 数据
- 需要使用自定义的音频前处理库(变声等)
本文介绍如何使用声网 Web SDK 在项目中实现自定义的音频采集。
## 实现方法 [#实现方法-3]
开始前,请确保你已参考[快速开始](/zh-CN/realtime-media/rtc/get-started/quick-start)在你的项目中实现基本的实时音视频功能。
SDK 提供 `createCustomAudioTrack` 方法,支持通过传入一个浏览器原生的 [`MediaStreamTrack`](https://developer.mozilla.org/zh-CN/docs/Web/API/MediaStreamTrack) 对象来创建本地音频轨道,你可以通过这个方法实现自定义音频采集。如果需要使用多个音频源,调用 `createCustomAudioTrack` 方法创建多个本地音频轨道即可。
例如,你可以调用 `getUserMedia` 方法获取 `MediaStreamTrack` 对象,再将该对象传入 `createCustomAudioTrack` 创建可以在 SDK 中使用的本地音频轨道对象。
```javascript
navigator.mediaDevices.getUserMedia({ video: false, audio: true })
.then((mediaStream) => {
const audioMediaStreamTrack = mediaStream.getAudioTracks()[0];
// create custom audio track
return AgoraRTC.createCustomAudioTrack({
mediaStreamTrack: audioMediaStreamTrack,
});
})
.then((localAudioTrack) => {
// ...
});
```
同样,你也可以利用强大的 [Web Audio API](https://developer.mozilla.org/zh-CN/docs/Web/API/Web_Audio_API) 来获取 `MediaStreamTrack`,实现定制化的音频处理。
## API 参考 [#api-参考-3]
- [`createCustomAudioTrack`](/zh-CN/api-reference/rtc/web/interfaces/iagorartc#createcustomaudiotrack)
- [`LocalAudioTrack`](/zh-CN/api-reference/rtc/web/interfaces/ilocalaudiotrack)
<_PlatformProcessedMarker close="true" />
<_PlatformProcessedMarker groupMode="structured" canonicalPlatform="web" platform="windows" />
声网默认的音频模块可以满足在 App 中使用基本音频功能的需求。声网 SDK 支持使用自定义的音频源和自定义的音频渲染模块为你的 App 添加特殊的音频功能。
## 技术原理 [#技术原理-3]
实时音频传输过程中,声网 SDK 通常会开启默认的音频模块。在以下场景中,你可能会发现默认的音频模块无法满足开发需求,需要自定义音频采集或自定义音频渲染。例如:
- App 中已有自己的音频模块。
- 需要使用前处理库处理采集到的音频。
- 某些音频采集设备被系统独占。为避免与其他业务产生冲突,需要灵活的设备管理策略。
使用自定义音频源管理音频帧的采集、处理和播放时,需要使用声网 SDK 外部方法。
#### 音频数据传输 [#音频数据传输-3]
下图展示在自定义音频采集、音频渲染时,音频数据的传输过程。
**自定义音频采集**

- 你需要使用 SDK 外部方法自行实现采集模块。
- 调用 `pushAudioFrame`,将采集到的音频帧发送给 SDK。
**自定义音频渲染**
- 你需要使用 SDK 外部方法自行实现渲染模块。
- 调用 `pullPlaybackAudioFrame` 获取远端用户发送的音频数据。
## 前提条件 [#前提条件-3]
在进行操作之前,请确保你已经在项目中实现了基本的实时音视频功能。详见[实现音视频互动](/zh-CN/realtime-media/rtc/get-started/quick-start)。
## 实现方法 [#实现方法-4]
### 自定义音频采集 [#自定义音频采集-3]
本节介绍如何实现自定义音频采集。
参考以下调用时序图,在你的 App 中实现自定义音频采集:
#### API 调用步骤 [#api-调用步骤-3]
本节介绍如何实现自定义音频采集。
参考如下步骤,在你的项目中实现自定义音频采集功能:
1. 调用 `joinChannel` 加入频道前,调用 `setExternalAudioSource` 开启和配置自定义音频采集。
```cpp
// 指定自定义音频源
m_rtcEngine->setExternalAudioSource(true, m_capAudioInfo.sampleRate, m_capAudioInfo.channels);
// 本地用户加入频道
ChannelMediaOptions option;
option.autoSubscribeAudio = true;
option.autoSubscribeVideo = true;
m_rtcEngine->joinChannel("Your token", szChannelId.c_str(), 0, option);
```
2. 使用 SDK 外部方法自行实现音频的采集和处理。
3. 调用 `pushAudioFrame`,将音频帧发送给 SDK,留作备用。
```cpp
mediaEngine->pushAudioFrame(AUDIO_RECORDING_SOURCE, &m_audioFrame);
```
### 自定义音频渲染 [#自定义音频渲染-3]
本节介绍如何实现自定义音频渲染。你可以采用如下两种方式实现自定义音频渲染。
参考以下调用时序图,在你的 App 中实现自定义音频渲染:
1. 调用 `joinChannel` 加入频道前,调用 `setExternalAudioSink` 开启和配置自定义音频渲染。
```cpp
// 开启自定义音频渲染
// 采样率 (Hz) 可以设置为 16000、32000、44100 或者 48000
// 声道数可以设置为 1 或 2
nRet = m_rtcEngine->setExternalAudioSink(m_renderAudioInfo.sampleRate, m_renderAudioInfo.channels);
```
2. 加入频道后,调用 `pullAudioFrame` 获取远端用户发送的音频数据。使用你自己的音频渲染器处理音频数据,然后播放已渲染的数据。
```cpp
void CAgoraCaptureAduioDlg::PullAudioFrameThread(CAgoraCaptureAduioDlg * self)
{
int nRet = 0;
agora::util::AutoPtr mediaEngine;
mediaEngine.queryInterface(self->m_rtcEngine, AGORA_IID_MEDIA_ENGINE);
IAudioFrameObserver::AudioFrame audioFrame;
audioFrame.avsync_type = 0; // 预留参数
audioFrame.bytesPerSample = TWO_BYTES_PER_SAMPLE;
audioFrame.type = agora::media::IAudioFrameObserver::FRAME_TYPE_PCM16;
audioFrame.channels = self->m_renderAudioInfo.channels;
audioFrame.samplesPerChannel = self->m_renderAudioInfo.sampleRate / 100 * self->m_renderAudioInfo.channels;
audioFrame.samplesPerSec = self->m_renderAudioInfo.sampleRate;
audioFrame.buffer = new BYTE[audioFrame.samplesPerChannel * audioFrame.bytesPerSample];
while (self->m_extenalRenderAudio )
{
// 拉取远端音频数据
nRet = mediaEngine->pullAudioFrame(&audioFrame);
if (nRet != 0)
{
Sleep(10);
continue;
}
SIZE_T nSize = audioFrame.samplesPerChannel * audioFrame.bytesPerSample;
self->m_audioRender.Render((BYTE*)audioFrame.buffer, nSize);
}
delete audioFrame.buffer;
}
```
#### 使用原始音频数据回调 [#使用原始音频数据回调-1]
开始前,请确保你的项目中已实现原始音频数据的采集和处理。详见[原始音频数据](/zh-CN/realtime-media/rtc/build/audio/raw-audio-data)。
参考如下步骤,在你的项目中调用原始音频数据 API 实现自定义音频渲染:
1. 从 `onRecordAudioFrame`,`onPlaybackAudioFrame`,`onMixedAudioFrame` 或者 `onPlaybackAudioFrameBeforeMixing` 获取待播放的音频数据。
2. 自行渲染并播放远端音频数据。
## 参考信息 [#参考信息-3]
### 示例项目 [#示例项目-3]
声网提供了开源的音频自采集和音频自渲染的示例项目供你参考,你可以前往下载或查看其中的源代码。
CustomAudioCapture} href="https://gitee.com/agoraio-community/API-Examples/tree/main/windows/APIExample/APIExample/Advanced/CustomAudioCapture" />
CustomAudioCapture} href="https://github.com/Shengwang-Community/API-Examples/tree/main/windows/APIExample/APIExample/Advanced/CustomAudioCapture" />
### API 参考 [#api-参考-4]
- [`setExternalAudioSource`](/zh-CN/api-reference/rtc/cpp-all-platforms/audio/audio-custom-capturenrendering#api_imediaengine_setexternalaudiosource2)
- [`pushAudioFrame`](/zh-CN/api-reference/rtc/cpp-all-platforms/audio/audio-custom-capturenrendering#api_imediaengine_pushaudioframe0)
- [`setExternalAudioSink`](/zh-CN/api-reference/rtc/cpp-all-platforms/audio/audio-custom-capturenrendering#setexternalaudiosink)
- [`pullAudioFrame`](/zh-CN/api-reference/rtc/cpp-all-platforms/audio/audio-custom-capturenrendering#pullaudioframe)
<_PlatformProcessedMarker close="true" />
<_PlatformProcessedMarker groupMode="structured" canonicalPlatform="web" platform="unity" />
声网默认的音频模块可以满足在 App 中使用基本音频功能的需求。声网 SDK 支持使用自定义的音频源和自定义的音频渲染模块为你的 App 添加特殊的音频功能。
## 技术原理 [#技术原理-4]
实时音频传输过程中,声网 SDK 通常会开启默认的音频模块。在以下场景中,你可能会发现默认的音频模块无法满足开发需求,需要自定义音频采集或自定义音频渲染。例如:
- App 中已有自己的音频模块。
- 需要使用前处理库处理采集到的音频。
- 某些音频采集设备被系统独占。为避免与其他业务产生冲突,需要灵活的设备管理策略。
使用自定义音频源管理音频帧的采集、处理和播放时,需要使用声网 SDK 外部方法。
#### 音频数据传输 [#音频数据传输-4]
下图展示在自定义音频采集、音频渲染时,音频数据的传输过程。
**自定义音频采集**
- 你需要使用 SDK 外部方法自行实现采集模块。
- 调用 `PushAudioFrame`,将采集到的音频帧发送给 SDK。
**自定义音频渲染**

- 你需要使用 SDK 外部方法自行实现渲染模块。
- 调用 `PullPlaybackAudioFrame` 获取远端用户发送的音频数据。
## 前提条件 [#前提条件-4]
在进行操作之前,请确保你已经在项目中实现了基本的实时音视频功能。详见[实现音视频互动](/zh-CN/realtime-media/rtc/get-started/quick-start)。
## 实现方法 [#实现方法-5]
### 自定义音频采集 [#自定义音频采集-4]
本节介绍如何实现自定义音频采集。
下图展示实现自定义音频采集的流程:
#### API 调用步骤 [#api-调用步骤-4]
本节介绍如何实现自定义音频采集。
参考如下步骤,在你的项目中实现自定义音频采集功能:
1. 调用 `JoinChannel` 加入频道前,调用 `CreateCustomAudioTrack` 创建自定义音频轨道并获取轨道 ID。
```csharp
private System.Object _rtcLock = new System.Object();
internal uint AUDIO_TRACK_ID = 0;
private void CreateCustomAudioSource()
{
lock (_rtcLock)
{
AudioTrackConfig audioTrackConfig = new AudioTrackConfig(true);
// 创建自定义音频轨道
AUDIO_TRACK_ID = RtcEngine.CreateCustomAudioTrack(AUDIO_TRACK_TYPE.AUDIO_TRACK_MIXABLE, audioTrackConfig);
this.Log.UpdateLog("CreateCustomAudioTrack id:" + AUDIO_TRACK_ID);
}
}
//加入频道,并且设置好自定义音频的轨道 id
private void JoinChannel()
{
lock (_rtcLock)
{ // 设置用户角色为主播即可在频道中发流
RtcEngine.SetClientRole(CLIENT_ROLE_TYPE.CLIENT_ROLE_BROADCASTER);
ChannelMediaOptions channelMediaOptions = new ChannelMediaOptions();
// 发布自定义采集的音频流
channelMediaOptions.publishCustomAudioTrack.SetValue(true);
// 设置自定义音频轨道 ID
channelMediaOptions.publishCustomAudioTrackId.SetValue((int)AUDIO_TRACK_ID);
// 音频自采集场景下,不发布麦克风采集的音频
channelMediaOptions.publishMicrophoneTrack.SetValue(false);
// 加入频道
RtcEngine.JoinChannel(_token, _channelName, 0, channelMediaOptions);
}
}
```
2. 使用 SDK 外部方法自行实现音频的处理。以下示例代码以打开一个 `.wav` 文件并读取其中的音频数据为例。
```csharp
private bool ReadAudioHeaderAndDetectFormat(FileStream fileStream, AudioFrame audioFrame)
{
// 确保文件至少有 44 字节
if (fileStream.Length < 44)
{
Debug.LogError("文件太短,不是有效的 WAV 文件。");
return false;
}
// 读取 RIFF 头
byte[] riffHeader = new byte[4];
fileStream.Read(riffHeader, 0, 4);
string riff = System.Text.Encoding.ASCII.GetString(riffHeader);
if (riff != "RIFF")
{
Debug.LogError("不是有效的 WAV 文件。");
return false;
}
// 读取文件大小
byte[] fileSizeBytes = new byte[4];
fileStream.Read(fileSizeBytes, 0, 4);
int fileSize = BitConverter.ToInt32(fileSizeBytes, 0);
// 读取 WAVE 标签
byte[] waveHeader = new byte[4];
fileStream.Read(waveHeader, 0, 4);
string wave = System.Text.Encoding.ASCII.GetString(waveHeader);
if (wave != "WAVE")
{
Debug.LogError("不是有效的 WAV 文件。");
return false;
}
// 读取格式块标签 'fmt '
byte[] fmtHeader = new byte[4];
fileStream.Read(fmtHeader, 0, 4);
string fmt = System.Text.Encoding.ASCII.GetString(fmtHeader);
if (fmt != "fmt ")
{
Debug.LogError("不支持的格式块。");
return false;
}
// 读取格式块大小
byte[] fmtSizeBytes = new byte[4];
fileStream.Read(fmtSizeBytes, 0, 4);
int fmtSize = BitConverter.ToInt32(fmtSizeBytes, 0);
// 读取音频格式(PCM=1)
byte[] audioFormatBytes = new byte[2];
fileStream.Read(audioFormatBytes, 0, 2);
int audioFormat = BitConverter.ToInt16(audioFormatBytes, 0);
if (audioFormat != 1)
{
Debug.LogError("不支持的音频格式。");
return false;
}
// 读取通道数
byte[] channelsBytes = new byte[2];
fileStream.Read(channelsBytes, 0, 2);
int channels = BitConverter.ToInt16(channelsBytes, 0);
// 读取采样率
byte[] sampleRateBytes = new byte[4];
fileStream.Read(sampleRateBytes, 0, 4);
int sampleRate = BitConverter.ToInt32(sampleRateBytes, 0);
// 读取字节率(数据传输率)
byte[] byteRateBytes = new byte[4];
fileStream.Read(byteRateBytes, 0, 4);
int byteRate = BitConverter.ToInt32(byteRateBytes, 0);
// 读取块对齐
byte[] blockAlignBytes = new byte[2];
fileStream.Read(blockAlignBytes, 0, 2);
int blockAlign = BitConverter.ToInt16(blockAlignBytes, 0);
// 读取位深
byte[] bitsPerSampleBytes = new byte[2];
fileStream.Read(bitsPerSampleBytes, 0, 2);
int bitsPerSample = BitConverter.ToInt16(bitsPerSampleBytes, 0);
Debug.Log($"格式: PCM");
Debug.Log($"通道数: {channels}");
Debug.Log($"采样率: {sampleRate} Hz");
Debug.Log($"字节率: {byteRate} bps");
Debug.Log($"块对齐: {blockAlign}");
Debug.Log($"位深: {bitsPerSample} bits");
// 设置音频帧的属性
audioFrame.bytesPerSample = BYTES_PER_SAMPLE.TWO_BYTES_PER_SAMPLE;
audioFrame.type = AUDIO_FRAME_TYPE.FRAME_TYPE_PCM16;
audioFrame.samplesPerSec = sampleRate;
audioFrame.samplesPerChannel = sampleRate / PUSH_FREQ_PER_SEC;
audioFrame.channels = channels;
audioFrame.renderTimeMs = 0;
audioFrame.RawBuffer = new byte[audioFrame.samplesPerChannel * (int)BYTES_PER_SAMPLE.TWO_BYTES_PER_SAMPLE * channels];
return true;
}
```
3. 开启一个子线程,并在子线程中不断调用 `PushAudioFrame`,将音频帧发送给 SDK,留作备用。
```csharp
// 每秒推送音频帧的次数
private const int PUSH_FREQ_PER_SEC = 20;
// 推送音频帧的线程
private Thread _pushAudioFrameThread;
// 开始推送音频帧
private void StartPushAudioFrame()
{
Action action = (filePath) =>
{
_pushAudioFrameThread = new Thread(PushAudioFrameThread);
_pushAudioFrameThread.Start(filePath);
};
StartCoroutine(PreparationFilePath(action));
}
// 推送音频帧的线程函数
private void PushAudioFrameThread(object file)
{
string filePath = (string)file;
using (FileStream fileStream = new FileStream(filePath, FileMode.Open))
{
var audioFrame = new AudioFrame();
// 读取音频头并检测格式
if (!ReadAudioHeaderAndDetectFormat(fileStream, audioFrame))
{
return;
}
// 定位音频数据块
SeekToAudioData(fileStream);
// 获取开始时间戳
double startMillisecond = GetTimestamp();
long tick = 0;
// 计算每帧的时间间隔
int freq = 1000 / PUSH_FREQ_PER_SEC;
while (true)
{
// 加锁以确保线程安全
lock (_rtcLock)
{
if (RtcEngine == null) break;
// 读取音频数据
int bytesRead = fileStream.Read(audioFrame.RawBuffer, 0, audioFrame.RawBuffer.Length);
// highlight-start
// 推送音频帧
int nRet = RtcEngine.PushAudioFrame(audioFrame, AUDIO_TRACK_ID);
// highlight-end
if (bytesRead == 0)
{
// 如果读取到文件末尾,则重新开始读取
fileStream.Seek(0, SeekOrigin.Begin);
}
if (nRet == 0)
{
tick++;
// 计算下一帧的时间戳
double nextMillisecond = startMillisecond + tick * freq;
// 获取当前时间戳
double curMillisecond = GetTimestamp();
// 计算需要休眠的时间
int sleepMillisecond = (int)Math.Ceiling(nextMillisecond - curMillisecond);
if (sleepMillisecond > 0)
{
// 休眠指定时间
Thread.Sleep(sleepMillisecond);
}
else
{
// 如果时间不足,则最小休眠1毫秒
Thread.Sleep(1);
}
}
else
{
// 如果推送失败,则休眠一个帧间隔
Thread.Sleep(freq);
// 重置开始时间戳
startMillisecond = GetTimestamp();
tick = 0;
}
}
}
}
}
// 获取当前时间戳(毫秒)
private double GetTimestamp()
{
return (DateTime.UtcNow - new DateTime(1970, 1, 1)).TotalMilliseconds;
}
```
4. 当你不需要再推送音频帧时,停止第三步中的子线程,调用 `DestroyCustomAudioTrack` 销毁自定义音频轨道,调用 `InitEventHandler` 取消注册回调事件,调用 `LeaveChannel` 离开当前频道。如果你还需要释放所有资源,调用 `Dispose`。
```csharp
private void OnDestroy()
{
Debug.Log("OnDestroy");
// 加锁以确保线程安全
lock (_rtcLock)
{
// 如果 RtcEngine 为 null,直接返回
if (RtcEngine == null) return;
// 取消注册回调事件
RtcEngine.InitEventHandler(null);
// 离开当前频道
RtcEngine.LeaveChannel();
// 销毁自定义音频轨道
RtcEngine.DestroyCustomAudioTrack(AUDIO_TRACK_ID);
// 释放 RtcEngine 资源
RtcEngine.Dispose();
RtcEngine = null;
}
// 等待 _pushAudioFrameThread 线程停止
_pushAudioFrameThread.Join();
}
```
### 自定义音频渲染 [#自定义音频渲染-4]
本节介绍如何实现自定义音频渲染。你可以采用如下两种方式实现自定义音频渲染。
下图展示自定义音频渲染的实现流程:
1. 调用 `JoinChannel` 加入频道前,调用 `SetExternalAudioSink` 开启和配置自定义音频渲染。
```csharp
// 声道数设为 2
private const int CHANNEL = 2;
// 采样率设为 44100 Hz
private const int SAMPLE_RATE = 44100;
// 每秒拉取音频帧的次数
private const int PULL_FREQ_PER_SEC = 100;
private void JoinChannel()
{
lock (_rtcLock)
{
RtcEngine.EnableAudio();
// 设置开启外部音频渲染
var nRet = RtcEngine.SetExternalAudioSink(true, SAMPLE_RATE, CHANNEL);
this.Log.UpdateLog("SetExternalAudioSink ret:" + nRet);
// 加入频道
RtcEngine.JoinChannel(_token, _channelName,"",0);
}
}
```
2. 加入频道后,调用 `PullAudioFrame` 获取远端用户发送的音频数据。使用你自己的音频渲染器处理音频数据,然后播放已渲染的数据。
```csharp
// 启动拉取音频帧的线程
private void StartPullAudioFrame(AudioSource aud, string clipName)
{
// 创建并启动一个新线程来执行 PullAudioFrameThread 方法
_pullAudioFrameThread = new Thread(PullAudioFrameThread);
_pullAudioFrameThread.Start();
}
// 拉取音频帧
private void PullAudioFrameThread()
{
// 初始化音频帧相关变量
var avsync_type = 0;
var bytesPerSample = 2;
var type = AUDIO_FRAME_TYPE.FRAME_TYPE_PCM16;
var channels = CHANNEL;
var samplesPerChannel = SAMPLE_RATE / PULL_FREQ_PER_SEC;
var samplesPerSec = SAMPLE_RATE;
var byteBuffer = new byte[samplesPerChannel * bytesPerSample * channels];
var freq = 1000 / PULL_FREQ_PER_SEC;
// 创建并初始化 AudioFrame 对象
AudioFrame audioFrame = new AudioFrame
{
type = type,
samplesPerChannel = samplesPerChannel,
bytesPerSample = BYTES_PER_SAMPLE.TWO_BYTES_PER_SAMPLE,
channels = channels,
samplesPerSec = samplesPerSec,
avsync_type = avsync_type
};
audioFrame.buffer = Marshal.AllocHGlobal(samplesPerChannel * bytesPerSample * channels);
// 获取开始时间戳
double startMillisecond = GetTimestamp();
// 初始化计数器
long tick = 0;
// 进入无限循环,持续拉取音频帧
while (true)
{
int nRet;
// 使用锁确保线程安全
lock (_rtcLock)
{
// 检查 RtcEngine 是否为空,如果为空则退出循环
if (RtcEngine == null)
{
break;
}
nRet = -1;
//highlight-start
// 拉取音频帧
nRet = RtcEngine.PullAudioFrame(audioFrame);
Debug.Log("PullAudioFrame returns: " + nRet);
//hightlight-end
if (nRet == 0)
{
Marshal.Copy((IntPtr)audioFrame.buffer, byteBuffer, 0, byteBuffer.Length);
}
}
// 如果成功拉取音频帧,进行时间同步
if (nRet == 0)
{
tick++;
// 计算下一次应该拉取帧的时间
double nextMillisecond = startMillisecond + tick * freq;
// 获取当前时间
double curMillisecond = GetTimestamp();
// 计算需要休眠的时间
int sleepMillisecond = (int)Math.Ceiling(nextMillisecond - curMillisecond);
//Debug.Log("sleepMillisecond : " + sleepMillisecond);
// 如果需要休眠,则进行休眠
if (sleepMillisecond > 0)
{
Thread.Sleep(sleepMillisecond);
}
}
}
// 释放为 audioFrame.buffer 分配的内存
Marshal.FreeHGlobal(audioFrame.buffer);
}
```
#### 使用原始音频数据回调 [#使用原始音频数据回调-2]
开始前,请确保你的项目中已实现原始音频数据的采集和处理。详见[原始音频数据](/zh-CN/realtime-media/rtc/build/audio/raw-audio-data)。
参考如下步骤,在你的项目中调用原始音频数据 API 实现自定义音频渲染:
1. 从 `OnRecordAudioFrame`,`OnPlaybackAudioFrame`,`OnMixedAudioFrame` 或者 `OnPlaybackAudioFrameBeforeMixing` 获取待播放的音频数据。
2. 自行渲染并播放远端音频数据。
## 参考信息 [#参考信息-4]
### 示例项目 [#示例项目-4]
声网提供了开源的音频自采集和音频自渲染的示例项目供你参考,你可以前往下载或查看其中的源代码。
CustomCaptureVideo} href="https://gitee.com/agoraio-community/Agora-Unity-Quickstart/blob/main/API-Example-Unity/Assets/API-Example/Examples/Advanced/CustomCaptureAudio/CustomCaptureAudio.cs" />
CustomCaptureVideo} href="https://github.com/AgoraIO-Extensions/Agora-Unity-Quickstart/blob/main/API-Example-Unity/Assets/API-Example/Examples/Advanced/CustomCaptureAudio/CustomCaptureAudio.cs" />
CustomRenderAudio} href="https://gitee.com/agoraio-community/Agora-Unity-Quickstart/blob/main/API-Example-Unity/Assets/API-Example/Examples/Advanced/CustomRenderAudio/CustomRenderAudio.cs" />
CustomRenderAudio} href="https://github.com/AgoraIO-Extensions/Agora-Unity-Quickstart/blob/main/API-Example-Unity/Assets/API-Example/Examples/Advanced/CustomRenderAudio/CustomRenderAudio.cs" />
### API 参考 [#api-参考-5]
- [`JoinChannel`](/zh-CN/api-reference/rtc/unity/channel#api_irtcengine_joinchannel2)
- [`CreateCustomAudioTrack`](/zh-CN/api-reference/rtc/unity/audio/audio-custom-capturenrendering#api_imediaengine_createcustomaudiotrack)
- [`DestroyCustomAudioTrack`](/zh-CN/api-reference/rtc/unity/audio/audio-custom-capturenrendering#api_imediaengine_destroycustomaudiotrack)
- [`SetExternalAudioSource`](/zh-CN/api-reference/rtc/unity/audio/audio-custom-capturenrendering#api_imediaengine_setexternalaudiosource2)
- [`PushAudioFrame`](/zh-CN/api-reference/rtc/unity/audio/audio-custom-capturenrendering#api_imediaengine_pushaudioframe0)
- [`SetExternalAudioSink`](/zh-CN/api-reference/rtc/unity/audio/audio-custom-capturenrendering#api_imediaengine_setexternalaudiosink)
- [`PullAudioFrame`](/zh-CN/api-reference/rtc/unity/audio/audio-custom-capturenrendering#api_imediaengine_pullaudioframe)
- [`LeaveChannel`](/zh-CN/api-reference/rtc/unity/channel#api_irtcengine_leavechannel2)
- [`Dispose`](/zh-CN/api-reference/rtc/unity/initialize#api_irtcengine_release)
<_PlatformProcessedMarker close="true" />